Table of Contents
1.0 - Introduction
Temple Trekking
Temple Trekking is a very simple concept for a mini-game: get a villager of Burgh de Rott from point A to point B. While on your travels you will encounter many obstacles, ranging from Ghasts to bogs or giant snails, you will have to defend your villager through thick and thin or you'll get nothing for the task. Choosing from three paths (varying in difficulty), you will travel from Burgh de Rott to the temple on the River Salve and receive your reward.
Note that before you can start, you must have completed Priest in Peril, Nature Spirit, In Search of the Myreque and In Aid of the Myreque.
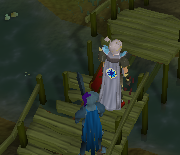
Burgh de Rott Ramble
As the state of the citizens of Burgh de Rott became apparent to travellers, villagers are wanting to help their fellow man, but none of them know the way to Burgh de Rott. Are you up to the task of guiding them through the Morytania swamp?
Before you can begin Burgh de Rott Ramble, you must also have completed the Darkness Of Hallowvale quest.
2.0 - Suggested Equipment
This section outlines some of the suggested armour, weapons and items you should take with you to the Temple Trekking mini game.
You can of course, alter our suggested equipment list by replacing some item with another more suited to you.
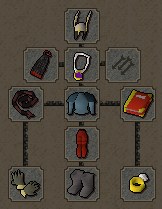
Melee is the best choice for this mini game; a strong offense, and good defence will greatly help you on your trek. The suggested equipment is shown in the image to the left.
- » Berserker helm has good defence and strength bonuses. Warrior helmet or rune full helm would be alternative choices.
- » Obsidian cape has good defence. Alternatively, take a god cape, or cape of legends.
- » Amulet of glory is overall, the best amulet to take.
- » Unholy book gives good attack and prayer bonuses. (can be replaced by rune defender)
- » Abyssal whip is ultimately the best weapon to use. A dragon scimitar, longsword, or dagger could also be used.
- » Barrows gauntlets have high attack and defence bonuses, although aren't necessary.
- » Ring of life is very useful as you bump into some pretty high level beasts on your trek.
- » Climbing boots give a strength bonus. Take these, or other metal boots. (like rune boots)
- » Armour - Any type of rune armour is good. Barrows isn't recommended as it is too risky.

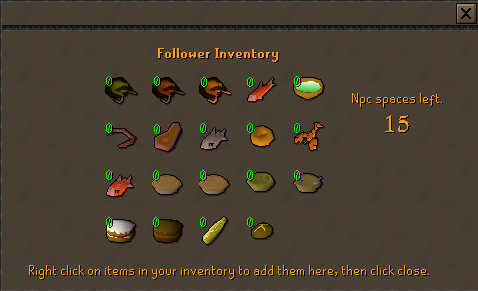
The items you take with you on the trek are very important. For example, you need enough food to heal you from high level beasts; enough druid pouches to prevent that food from decaying; and enough prayer restore potions so you can defeat those creatures you meet on your trek. The suggested inventory is shown to the right, although you can mix and match as much as you please. Remember, 4-dose potions are much better to bring along.
- » Prayer potions are an absolute must. Take 3 to 7 (4-dose) depending on your level.
- » A holy wrench can be useful.
- » Ectophial is another important item, making it easy to get back to Burgh de Rott.
- » Lumbridge teleport runes - to recharge your prayer (it is much better if you have Telly Tablets).
- » Rod of Ivandis is the best weapon to kill Vampyre Juvinates.
- » Silver sickle(b) is used to refill your druid pouch.
- » Druid pouches prevent ghasts from rotting your food.
Note: Casting bloom with your sickle to refill your pouch uses a few prayer points.
- » Dragon dagger(s) special attack is great for defeating some monsters quickly.
- » Gadderhammer can be used against the Shades, but a whip or dragon weapon is better.
- » Super strength/ attack potions can be useful against the tougher monsters.
- » Guthix balance can be used to seal Vampyre Juvinates.
- » Lobsters or Sharks can be used as food; keep in mind ghasts may rot your food.
3.0 - Villagers & Adventurers
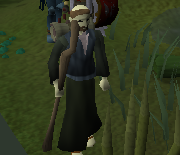
Now that you have your equipment ready, it's time to head out. If this is your first trek, you will need to speak to Veliaf, to get all the villagers out by the well. These are the voyagers who you will trek with throughout the mini game.
There are six villagers and six adventurers for you to choose from, ranging in level of difficulty to protect. If you choose to protect a hard villager or adventurer, you will receive a far better reward - as they are far harder to protect than the easy villagers and adventurers. This is shown in the table below:
| Villagers |
|
Adventurers |
| Easy |
Medium |
Hard |
Easy |
Medium |
Hard |
| Fyiona Fray |
Valantay Eppel |
Smiddi Ryak |
Adventurer |
Apprentice |
Forester |
| Dalcian Fang |
Jayene Kliyn |
Rolayne Twickit |
Mage |
Ranger |
Woman-at-arms |
To increase the NPC follower chances of survival you can provide food to all characters you guide to either Burgh de Rott or to Canifis. Though you give the specific food to one character, they all share it. The character can only carry a maximum of 15 pieces of food, but you can give more food during events; simply use the food with the character you are guiding. The following foods can be given to the NPC followers:
Once you have chosen which villager you are going to safeguard throughout the trek, you get to choose a route. Again, these vary in level of difficulty, with better rewards being given for the harder treks. Route one is easiest, route two is medium, and route three is the hardest. Once you pick your route, the trek begins, so make sure you choose well.
Before you begin, here are a few points of information:
- The easier routes have battle areas, where swamps and reeds can shield you from some monsters.
- As a monster attempts to attack your villager, kill that one off first. If they're stacked on top of each other, make your villager visible to them by standing sideways and the monster may separate from the pack.
- Route three has nothing but traps.
- Combine a hard or medium route with a weak villager, and you may receive the best reward possible.
- If you fail a route, you will be dropped off in a random area of Mort Myre swamp.
- If you were on route three, you may be let out near the Hollows, - the secret route to Canifis - which is opened during the In Search of the Myreque quest.
- The 'head' monster with its flailing tentacles only appears on route three.
- Upon completing your trek, you will be near Drezel's temple. From here you can teleport, or head east to Canifis to bank.
Each route presents its own dangers, but the level of difficulty depends on the route you choose. Here are some of the more basic differences between the routes:
 |
This route is designed for lower to medium level players who like a little challenge.
In taking this route, you will have many encounters with enemies or obstacles. You can however, evade encounters with monsters if you wish, but you must do the puzzles. |
 |
Far more difficult than route one, this route provides a greater challenge to medium to high level players.
Most of the enemies you may face are over level 100, and often come in groups, so it will be a tough trek. You must kill half of the enemies that attack you to evade them. As with route one, you cannot evade puzzles. |
 |
The hardest route of them all: for the high levels only!
All beasts you will encounter on this route exceed level 100, and are very vicious. However, you may not encounter that many beasts at all on this trek, but when you do... you will be trapped and in for the long haul unless you wish to leave the mini game. This route does not offer the ability to evade anything. Be careful. |
4.0 - Beasts and Puzzles
The trek will not be easy, as you and your charge will encounter powerful creatures or annoying puzzles along the way. The level, and number of these encounters depend upon the route you chose. These are shown below:
| Encounters |
Description |
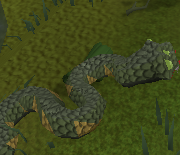 |
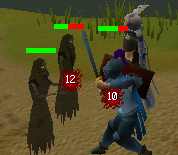
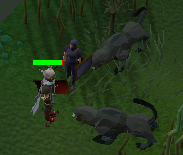
Fast, strong and deadly Giant Snakes can be tough. Weak villagers die quickly if you're not careful.
Giant Snakes are often found in big open areas; who they attack first is random. Ensure that you use protect from melee, or their strong, quick attacks will do you in quickly. Just pick them off one at a time until they're all gone.
Once you've killed them, you can use a knife on the dead snakes to obtain its skin, which can be crafted into snakeskin armour. |
 |
Vampyre Juvinates are a real pain: you can only use your Rod of Ivandis, or silver sickle to kill them.
Although they aren't that strong, it's a good idea to turn on protect from melee, and drink a dose of your super strength/ attack potions when you run into them on route three.
It's easier to kill them off on route one and two, so you may be able to kill them naturally, without prayer or potions, depending on your level. |
 |
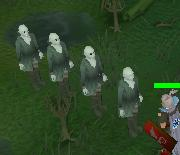
The black Shades can either be very easy, or very hard to kill, depending on what equipment you've brought with you.
Generally, they line up behind one another, waiting for their turn to attack you, meaning you can fight one at a time. One or two might attack from a different side, but it makes little difference. Also, most of the time you act as a blocker between them and your villager so there isn't much to worry about if you stay still while they attack you. If the villager is facing the Shades, and he's blocking them from you, then simply step on the same square as your village, and he'll hide himself behind you.
Be very careful here if you have one of the harder villagers to protect: if a Shade gets them, it's generally over pretty quickly, unless you can kill the Shade in a couple of attacks.
Don't worry about losing here though, as you're right next to the bridge leading to Burgh de Rott, so you can start again easily. |
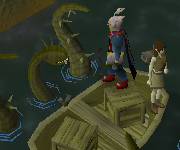 |
The Head with the flailing tentacles can be a real bother. However, if dealt with correctly, you'll have bypassed it in no time.
With this encounter, you will be on a small boat; four level 99 tentacles surrounding the boat, and a level 140 head in the middle. They will all attack you at once, so ensure that you enable protect from melee. To kill it, you need to beat all the tentacles first, then the head.
When you start, the villager will be standing defenceless in one of the corners, with a tentacle attacking it. The trick to protecting the villager, is to attack the tentacle he is nearest to first. The tentacles are fairly weak, and will die fast. Once you clear the corner your villager is in, he'll be safe unless you move. Kill the tentacles in succession, to ensure that your villager is protected behind you. |
 |
The Giant Snails are very easy to kill. They use a very rapid ranged attack, so ensure that you use protect from ranged here.
Pick them off one by one until they're all gone. The snails drop Giant snail shells, which you can pick up. They can be exchanged for coins and some crafting experience in Dorgesh-Kaan. Wearing snelms will reduce the chance that snails hit you. |
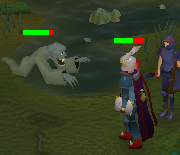 |
These aren't regular Ghasts: they still drain your Druid pouches, but are much, much stronger.
Be very careful here: if you don't have enough druid pouches, you will find that they will rot all of your food in a matter of seconds. If you don't have enough pouches, there are an abundance of logs, trees and sticks laying around that you can cast bloom on, to replenish your supply of pouches. Make sure that you enable protect from melee while you attack them.
Don't worry as much about your villager, as the ghasts tend to go after you the most. |
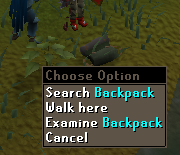 |
This puzzle can be tough if you don't know what you should be doing. Read the instructions carefully.
Firstly, search the backpack on the ground, just near the river, and you will find a knife. Now go near the river, and cut the hanging vines on the tree. Use the vines with each other to make a long vine. Now use this on the highest branch you can see, then right click it, and choose the 'swing across' option. The villager will follow you. |
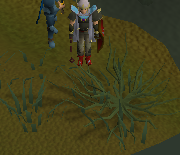 |
For this fairly simple puzzle, you will need at the least, two free inventory spaces. If you're full of food, use them on your villager so they don't go to waste. Now, near here, you should find a spiny bush. Simply use a weapon with a blade on it, and you will receive some sticks. If you don't have a bladed weapon, you can just try walking out on the bog blind, as failing deals no damage.
Now that you have the sticks, you can cross the bog. Simply use a stick with a space in the bog, and if you get a message saying the ground seems firm, walk onto that spot. If the ground is too soft, ignore it and move on. The reason you need multiple sticks, is because one may get stuck in the bog, and you'll lose it.
If you run out of sticks, retrace your steps back and cut some more sticks off the spiny bush. Remember to keep track of the path you took though, as you can take it again. Once you're across, your villager will follow automatically. |
 |
This puzzle is very simple. Kill the nearby zombie, and retrieve his bronze axe.
Cut down the dead trees, and equip the axe. Use the logs on the bridge, and you will soon fix it.
Note that sometimes the wood will come looking for you, meaning you should be ready to attack some undead lumberjacks. The lumberjacks drop their clothing when you've killed them - clothing that, when worn whilst woodcutting, gives an extra 2.5% woodcutting XP for every log you chop.
Go over the bridge and continue on your route. |
 |
Abidor Crank is the only helpful person you will encounter on your trek.
He will heal you, and add a few bonus hit points onto your level. He will also, amazingly, unrot your rotten food. |
 |
The Nail Beast hits often but low and drops nail beast nails which you can use with a super restore potion, unicorn horn dust and snake weed to make a sanfew serum.
The nail beast poses a strong threat to the mage and adventurer. |
5.0 - Rewards
The reward you receive depends on what route you trekked, which villager you protected, and how many encounters you completed. Each route has a different reward token. Route one is blue, route two is yellow and route three is red.
Your reward will be random and you will get one of the following items:
- » Coal ores: 17-102
- » Bowstrings: 29-200
- » Silver bars: 9-120
- » Rune essence: 81-468
- » Watermelon seeds: 9-65
- » Unidentified herbs (toadflax, harralander, tarromin): 12-75
- » Raw lobsters: 9-56
- » Tome of Learning: 1
A Tome of Learning is a rather rare reward from a trek that gives some experience in a certain skill. There are different tomes for each route; the color of the tome matches the color of the reward token. The skills that have Tomes for them, are Agility, Firemaking, Fishing, Mining, Slayer, Thieving and Woodcutting. The experience you get depends on your route:
- » Route 1: 550-1,100
- » Route 2: 990-2,035
- » Route 3: 990-4,015
 Though not technically a "reward" of temple trekking, lumberjack clothing is an added bonus that can be obtained from the Broken Bridge test. Each piece of lumberjack clothing (hat, top, legs, boots) gives a small woodcutting XP bonus for every log you chop. When all pieces are worn together, you get a 2.4% increase in the amount of XP you obtain per log. Though not technically a "reward" of temple trekking, lumberjack clothing is an added bonus that can be obtained from the Broken Bridge test. Each piece of lumberjack clothing (hat, top, legs, boots) gives a small woodcutting XP bonus for every log you chop. When all pieces are worn together, you get a 2.4% increase in the amount of XP you obtain per log.
6.0 - FAQ
Q: I just went on an extremely hard trek, and didn't get a Tome, and the rest of my reward was junk! What's up with that?
A: The rewards are completely random for each route, and are based on: the difficulty of the route; the difficulty of protecting your villager; the number of encounters you complete. Tomes are quite uncommon: you shouldn't expect to get them.
Q: How many encounters do you get on Route three?
A: It's fairly random, the amount of beasts or puzzles you encounter, but from personal experience, the most I've had is four.
Q: What are the giant snail shells used for?
A: The giant snail shells can be exchanged in Dorgesh-Kaan for some gp and crafting experience. Perfect shells will give more money and experience than regular shells. |


 OSRS RuneScape Help
 RuneScape Community Forums
 Skill Guides
 Quest Guides
 City Guides
 Guild Guides
 Mini Game Guides
 Treasure Trail Help
 Miscellaneous Guides
 Dungeon Maps
 Mining Maps
 Items Database
 Monsters Database
 Shops Database
 Tome/Books Database
 Skill Calculators
 Coordinate Locator
 Zchat Clan Chat
 Stuck on something? Want some more tips? Ask on our forums.

